To create a ToolZ widget for Dragon, you will need to:
- Create a ToolZ report of type Dragon Widget
- Publish and activate your report for “Everyone”
- Add your report to a Dragon dashboard
You should also make yourself aware of the potential gotchas and best practices when working with Widgets.
Create a ToolZ report of type Dragon Widget
The first step in creating a ToolZ widget for Dragon is to create your report on the ToolZ side. For the most part, this is just like creating any ToolZ report, but you will want to select one of the Dragon widget types for your "Report Type/CSS."

There are two types of Dragon widgets:
- "Regular" widgets have both width and height restrictions. Their content should not be larger than 400px wide or 250px high.
- "Wide" widgets have a width restriction of 880px but do not have a height restriction.
Selecting a Dragon report type will activate a list of Dragon Widget Jumpstart templates. Select one of these to get you started. Note that these are just intended to be used as jumping off points and are not intended to be used as-is.

Once you have selected a Jumpstart, save and launch the Report Editor as usual. You can then modify the template to create your desired Widget. All of the usual ToolZ functionality is available to you, with the exception of report controls. Because these Widgets will be displayed within Dragon, which has its own filter controls, you cannot add your own controls to ToolZ Dragon Widgets. Date, level, and wave filters are passed from Dragon’s controls to your ToolZ Widget.
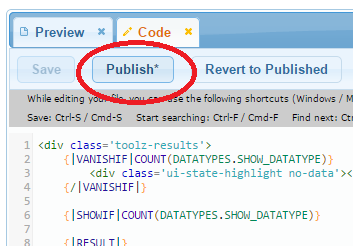
While editing, your report will display on the “Preview” tab the same way that it will display within Dragon. This will allow you to be sure your Widget will look good in Dragon prior to publishing.

While editing your Widget’s CSS and JavaScript, please be very careful as some CSS and JavaScript changes may affect the look and functionality of your entire Dragon dashboard. Care should be taken to give your HTML elements distinct classes and IDs so that your CSS/JS applies only to your Widget.
Publish and activate your report
Once you’re happy with your Widget, you will want to publish your ToolZ report, CSS, and JavaScript, just as you would for any other ToolZ report. Your changes will not be visible in Dragon until you have published your report.
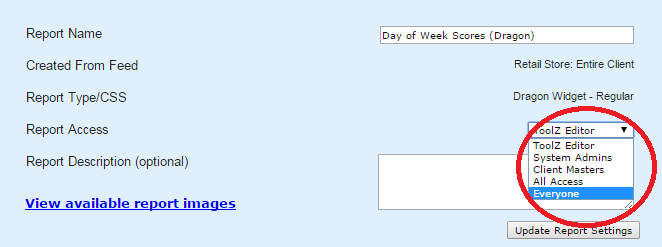
Next, you will need to activate your report for "Everyone." Because Dragon dashboards can be viewed by any user type, only ToolZ reports activated for everyone will be available in Dragon. If you want to hide your widget's content from certain user types, you can do that by customizing your report’s content by user type.
Don’t worry, though. Dragon reports only display in Dragon. They won't display on your clients' regular reports pages or "Jump to Report" menus.
Add your report to a Dragon dashboard
Once your report is published and activated, you’re ready to add it to a Dragon view. You can either add it to an existing view or create a new one. Your ToolZ Widgets can be mixed with core Dragon Widgets without restriction.
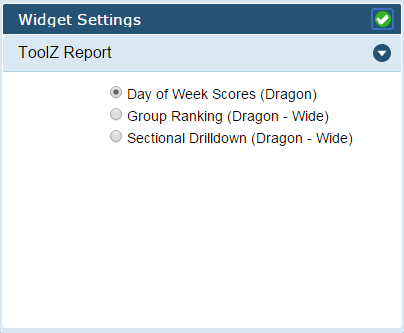
The first step is to select the ToolZ Widget type and drag it onto your dashboard.

The display will default to the first ToolZ Widget you have, alphabetically. You can then edit the Widget’s settings to select a different report.
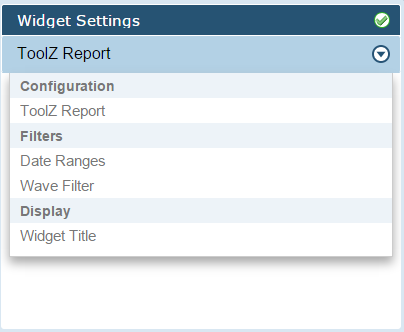
Additional settings such as the widget title and default filters can also be modified.
And that’s it! Your ToolZ Widgets are now good to go in Dragon. They can display on your dashboards, be exported to PDF, and be distributed just like regular Dragon Widgets.

Gotchas and Best Practices
Although the combination of ToolZ and Dragon is a very powerful one, there are some potential data discrepancies that you should be aware of. These discrepancies are listed below, along with some recommendations for how to address them.
ToolZ Data is not Realtime
The data in Dragon is updated immediately. As soon as a shop is finalized or modified its data will be displayed in Dragon. However, a ToolZ report’s data is only updated when its data feed is run. This can lead to some mismatches between the data in regular Dragon Widgets and that displayed in ToolZ Widgets.
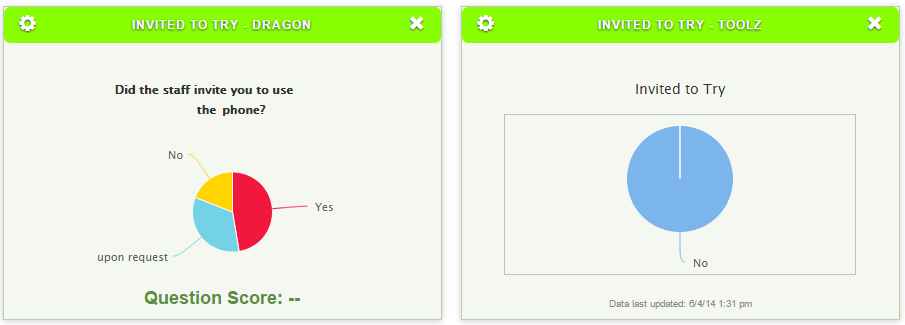
Data on the left is updated immediately, data on the right is old!
To mitigate this issue, we recommend that you:
- Schedule your Widget’s ToolZ feed to run daily
- Run your ToolZ Widget’s feed manually prior to any presentations or exports
- Do not remove the “Data last updated” label on your Widget
ToolZ Widgets can have Invisible Filters
As you know, you have the ability to filter the data in your ToolZ Widget by nearly anything you want. However, the users viewing your Widget won’t be aware of these “invisible” filters.
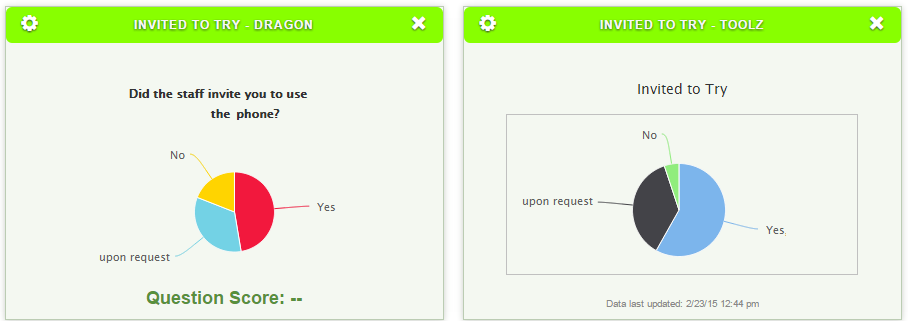
The data on the right is being further filtered by the response to another question
It is up to you, as the developer, to make it clear to your user that the data has additional filters. We recommend doing so through the use of clear and concise labelling.

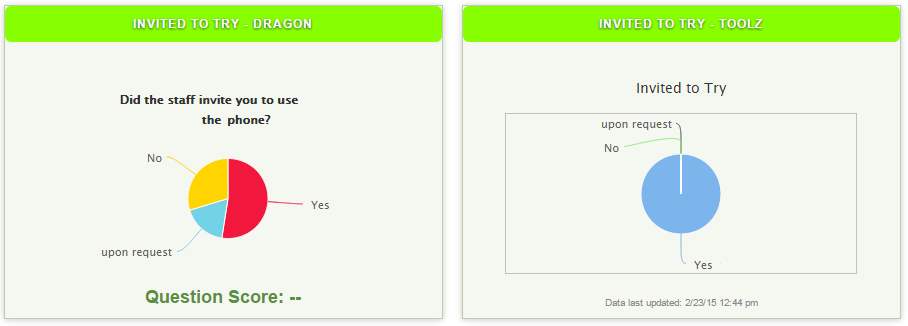
Labelling indicates what’s different about the graph on the right
ToolZ Permissions are More Restrictive
Dragon allows users who have restricted access to filter by “Entire Company” and see higher-level aggregate values that they typically would not have access to in SASSIE. Unless specifically overridden, ToolZ will still filter by a user’s access level when “Entire Company” is selected.
The data on the left is displaying for the entire company, whereas the data on the right is filtered by the user’s permission
Soon, Dragon will display a message to indicate that data is still being filtered by permission. In the meantime, you’ll want to be aware that the “Entire Company” filter may cause discrepancies.